Showing posts with label home. Show all posts

Tuesday, December 13, 2011

More bathroom progress!

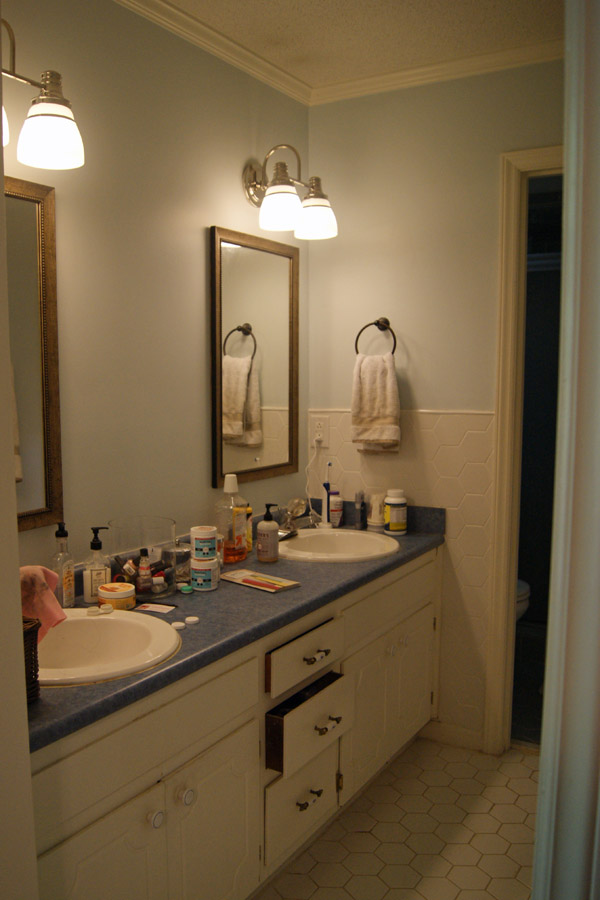
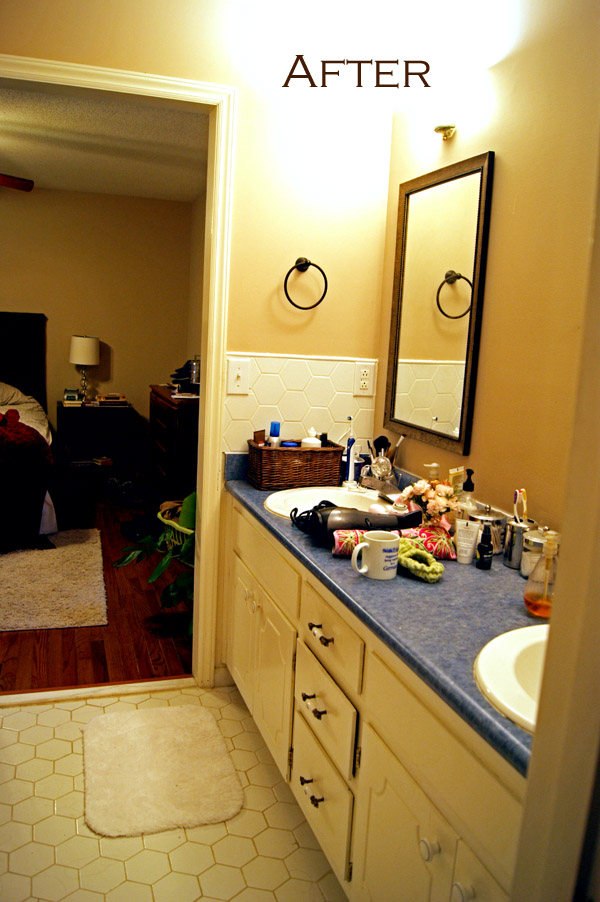
We made further progress on the master bathroom this past weekend and although we have a few things we still need to do, we're now at a point where we have a fully functioning master bath!  Which means that when kiddo makes his/her arrival in the next few weeks, our house will at least be semi put-together and we won't have bathroom vanities in the guest bedroom. 

The floor is done, the backsplash tile has been laid and grouted, and the vanities are installed.  Next up we have to scoot the light fixtures up a few inches in order to make room for the medicine cabinets.  We also have to do a little caulking and put up the baseboards and we're done!  So much for a quick little project! 

Before:


After:


Such a weight off our shoulders to be at this point!  Ahhhhh....

Monday, December 12, 2011

Finally! Finished nursery pics

It's been awhile since I updated the ol' blog with new pics of the nursery!  We've gotten pretty much everything set up and we're about as ready to go as possible, which is good, since I'm now 36 weeks!  My gut tells me that this baby won't make his/her arrival until 39 weeks, but I was a Girl Scout and I like to be prepared. 

After I spotted the Melissa and Doug oversized stuffed giraffe, we ended up with an unintentional giraffe "theme" of sorts, so I just kind of went with it without going overboard, cuz Lord knows I hate cutesy "theme-y" rooms.  All of the elements in the room were chosen with the intention of a) being gender neutral, and b) growing with this baby, so we don't have to redecorate in 2 or 3 years just because the kiddo outgrows stuff.  I also wanted a pretty room because I know that I'll be spending my fair share of time in there and I like to look at pretty things. 

Anyway, without further ado, here's the finished nursery!  (Sources below.)


I'm in love with the gold pouf.  It was a bit extravagant, but I think it kind of makes the whole room come together.  Plus, it's so versatile and can be used in any room in the house, so it'll get a lot of use.  (Can you tell I'm still justifying that purchase?)


The pillow fabric was leftover from when I recovered the dining room chairs last year.  I loved the Chaing Mai fabric that I used in my original inspiration board, but at like $200 a yard, that wasn't going to happen.  I needed a fabric to tie in the orange and blue and it was free! 


My good friend Kate sent me this awesome nightlight for my baby shower!  Is it not the cutest thing ever???  I'm in love with it.


See that cute baby in the picture frame?  Guess who it is?  (Hint: it's me.)


I picked up the giraffe on sale last week and I'm in love with him.  His name is Kyle.  The crib "skirt" is made of leftover fabric from the glider.  I used velcro to adhere it to the mattress support so it could be easily removed for cleaning. 

The crib rocks my world.  It's absolutely gorgeous and made in the US out of real sustainable hardwood!  (No MDF or anything.)  We also bought the toddler rails and the adult bed conversion kit, so it will eventually convert to a full size bed for kiddo.  It was a little bit more money upfront, but when we factor in the number of years we'll get out of it, it'll be cheaper in the long run.


Finally, the opposite side of the room.  I was originally going to use the baby animal prints from my inspiration board, but they ended up being a bit out of budget when all was said and done.  The giraffe print was purchased at 20% off, which made it super reasonable. 

Also, that thing on the floor between the dresser and the crib is a medicine cabinet for the master bath, which obviously won't stay on the floor forever.

And now for the sources:

Crib, Baby's Dream Legendary
Rug, Martha Stewart Living Chrysanthemum rug in Wrought Iron
Curtains, Ikea Lenda
Dresser, Ikea Edland
Bookshelf, Ikea Smadal
Giraffe print, Z Gallerie
Fabric, Celerie Kemble Betwixt
Large stuffed giraffe, Melissa and Doug
Gold pouf, Furbish
Giraffe nightlight, Jonathan Adler
Paint colors, Martha Stewart's Wrought Iron (navy) and Heavy Cream
Mirror and lamps, HomeGoods

Wednesday, November 16, 2011

Two More Steps Forward

This past weekend we made progress on the bathroom.  Hallelujah!  As documented here, this project has been SO frustrating, but I'm starting to feel more optimistic that a) we will finish the project someday and b) when we do, it'll look great.

On Saturday, we spent several hours pulling up the tile (that we had just laid about 3 weeks ago) and scraping off all of the thinset.  We got the floor nice and smooth, swept, vacuumed, vacuumed again, then wiped down the cement board just to start with a clean surface that the new thinset would (hopefully) stick to:


During this process, we pretty much identified that the problem was due to bad thinset.  I think the bag we had originally purchased was just old; it scraped off ridiculously easily as a very fine powder. 

Of course, Grizabella helped:


Not really.  She napped on the bed most of the time and only came in for a final inspection.  We passed.

Then on Sunday, we got to work relaying the tile (that we had just laid 3 weeks ago.  Did I mention that already?  Sorry.  Just a little irritated about the whole thing.).  Since we had already cut the tiles to fit the last time, we just had to keep track of which tiles went where and so the whole thing took about an hour and a half to lay.  Chris mixed the thinset and acted as the "gopher" while I sat my 7 month pregnant ass on the floor and laid the tile.  Our system paid off:


The best news?  After letting it set for 24 hours we walked on the tile and...IT STUCK!!!  Choirs of angels sung, rainbows appeared, and puppies and kitties pranced around in harmony, it was so magical.

This means that we can pull off the wall tile this coming weekend, put the grout in, and if we have enough time, we may be able to reinstall the vanities!  We're getting there!

Friday, November 11, 2011

New Living Room Chairs!

A week or so ago I bought two of these chairs online for the living room:


I'm so thrilled with how they look in our living room:

We still need to add a few finishing touches to the room:  curtains, some side tables, and better lighting will be first, then I also want to add some crown molding to the bookshelves to make them look more like built-ins.  I also desperately want this pillow for the sofa:

Oh yes, it will be mine.

Anyway, although we still have a ways to go before the room looks like I want it to, it's still far, far better than where it was a year ago:


Wednesday, November 9, 2011

This project SUCKS

Sorry about the brief hiatus.  We've been busy around here and the bathroom project is not really going all that well.


Looks not too bad, right?  We laid the tile and waited the requisite 24 hours before stepping on it, only to find this:


Preeeetty sure that you're not supposed to be able to lift tile up like that. 

So, are you ready for a kind of long story?  Two weeks ago, we laid the tile.  Found out that the tile didn't stick in several places.  The following weekend we installed the vanities anyway so we'd have a functioning bathroom while we had guests in town last weekend for my baby shower.  So guess what we get to do this coming weekend?  We get to uninstall the vanities, fix the floor, then wait for the floor to dry before grouting.  Then we can reinstall the vanities!

But wait!  There's more!  The vanities and faucets are so much taller than the previous ones that the medicine cabinets don't fit between the vanities and the light fixtures.  So now Chris has to move the light fixtures up a few inches to accomodate everything.  All of this is before we even tile the backsplash or put baseboards back on. 

So, that's what we've been up to lately.  Good times!!!

Thursday, October 20, 2011

The state of things...

The master bathroom is torn up:


As a refresher, this is what it looked like as of last Saturday morning:


So, yeah.  We took out the vanity and on Monday morning my parents removed the tile floor.  That wasn't really in the original plan, but there were cracks in the tile, the grout was horrible, and it was laid directly on the sub-floor, which isn't ideal.  While it'll be more work, it'll be worth it to do it once and do it right.

We're not straying too far from what the old tile looked like--we'll be going with this hexagonal white pattern.  And the other day I picked up a bunch of different glass tiles to see which one we should use for the backsplash.  OF COURSE the one we liked far more than the others was the most expensive.  Of course.


The glass tile brings in the wall color, the white from the ceramic tile, the blue tile in the shower (which we're not changing for awhile even though I don't love it), and the gray from the vanities.  I'm super excited about our plan.

Also excited to get our house back to normal, especially since we'll have houseguests in two weeks:


Nothing says "Welcome!" like a bathroom vanity in the entryway.


The current state of our living room.  Yikes.

Friday, October 14, 2011

This is what we're going with

Short post today.  These are the vanities that we chose for the master bathroom:

And the medicine cabinets:


The medicine cabinets arrived already and the vanities should be in later today (they're both from the Martha Stewart Collection at Home Depot).  We'll spend some time tomorrow dismantling the existing vanity and figuring out the tile situation underneath.  Fingers crossed!!!  Is it all going to be done this weekend?  Highly, highly doubtful, but at least we're moving in the right direction.

Thursday, October 13, 2011

Master Bathroom

So, we knew when we moved into this house that we'd need to tackle the master bathroom at one point or another.  The shower tile is dated and the vanity offers surprisingly little storage and is just plain fugly:

(Ignore the "After" on the photos.  Also the white balance is totally off.)

(This is much more indicative of the actual colors)

This is pretty much what the countertop looks like on a daily basis because there is NO ROOM anywhere for the stuff we use on a day-to-day basis: contact solution, vitamins, hair products, etc.  Those mirrors aren't medicine cabinets, so as a result, all of the daily-use stuff just sits on the counter and drives me crazy.

So, a few weekends ago, we decided to get started on this whole project.  Unfortunately, the vanity is a non-standard (and HUGE) 78" wide.  We'd either have to have a custom cabinet built ($$$), or put two 36" cabinets together and then figure out what to do to make up the 6" of leftover space.  Or we could get two smaller vanities and make them completely separate, which is what we've decided. 

Unfortunately, we don't think the tile extends under the current vanities, so we'll have to figure that out.  So far we've ordered the vanities and they're on their way.  The medicine cabinets arrived yesterday. 

Anyway, this is what it looks like now that the walls have been painted and the ugly sconces were replaced with some pretty new light fixtures:


I LOVE the new light fixtures and the blue wall color is a lot better than the beige.  This coming weekend is DEMO TIME!  Muahahahaha!  I'm getting very excited.  Goodbye blue countertop! 

Tuesday, October 11, 2011

Painted Bathrooms

I think I promised these photos last week, but the fatigue I had in the first trimester came a-roarin' back last week and I never got around to posting the pics.  Anyway, I painted both the guest bathroom and the master bathroom the weekend before last in preparation for a mini bathroom makeover before the baby gets here.

Here's what we were working with before.  (Ignore the "After" written on the photo--it's from my House Anniversary post back in March.)


It all started when we decided to install a new light fixture (sorry I don't have a "Before" of the light fixture, but I promise you've seen them before in your life--a bar with 4 round bulbs on it--not terribly interesting).  When Chris removed the light fixture, we saw the room's original color: Salmon.  Mmmm...


The new light fixture doesn't have the same footprint:


So I picked out three paint colors and painted some swatches.  We ended up going with the top one, Martha Stewart's Salt Glaze.  (Also, I'm pretty sure Chris thought I was completely insane, since he couldn't tell a difference between the blues at all.)


Since the bathroom is pretty small, it didn't take me very long to paint and now it looks like this!:


So, future plans include removing the vanity and installing a new one (which may or may not require some tiling work), probably getting a new shower curtain, and removing the mirror and installing a medicine cabinet with some actual storage space.

Pics of the master bath to come as well.

Monday, October 10, 2011

Nursery Update

I wasn't going to post pics of the nursery until it was done, but that might be awhile, so I'll go ahead and post "In Progress" pics.  There are still a few things we need to do:  get artwork for above the dresser, find a small bookshelf for underneath the mirror (between the windows), and get a side table for next to the glider.  Once we get a bookshelf, we'll be on to a few other accessories and small projects and then we'll be done!

While navy blue might seem like an odd choice for a gender-neutral baby's room, I find navy really easy to work with and because of the light in the room (especially in the afternoon), the room doesn't feel dark at all.  I also opted for high gloss navy paint, which bounces the light around a bit instead of just sucking the light into the walls.

Anyway, here are some "in progress" pics for you:


Well?  What do you think?

Friday, September 16, 2011

Look what I made!

So, last week I shared with you my nursery plan and it included this gorgeous Schumacher Chiang Mai fabric:


Unfortunately, it's $250 per yard.  (Yes, you read that right.)  I found a seller on Etsy who makes small lumbar pillows out of this fabric for $62 (which, when compared to $250, is great!), but I still didn't really want to spend $62 on a small accent pillow.

I scoured various fabric stores and didn't really find anything that fit the bill.  I was looking for something colorful to tie in the blues of the nursery and bring in other colors.  Then I remembered the fabric that I used to recover our dining room chairs last year.  Jackpot.  I bought some light blue pom-pom trim and a small 14"x18" pillow and made my own.

Ta da!


It's obviously not the same as the Chiang Mai, but I'm really happy with how it turned out.  Oh, and the rocking chair?  The blue and white striped cushion looks far better in photos than it does in person, so those are getting redone completely in this fabric:


Haven't ordered the fabric yet, but I'm hoping to this weekend.

Speaking of which, it's Friday!  Have a great weekend!


Monday, September 12, 2011

Weekend Recap and Nursery Progress

This weekend was not at all long enough.  It was a productive weekend though, so at least I have something to show for the weekend.

On Saturday morning we got up and at 'em early(ish) to get to the baby store to pick up the crib.  The box was huuuuuuuuuuuuge and wouldn't fit in my brother-in-law's truck without taking the camper shell off, so there was some logistical maneuvering and a little extra work, but we got the crib back to the house safe and sound.

The box.  Told you it was big.


On Saturday afternoon we bought Chris's birthday gift (a charcoal grill and accessories) and did some puttering around the house and then on Sunday morning we assembled the crib!  Here's Chris explaining that you put the baby on this piece to sleep. (You don't.  That piece is the side.)


Anyway, about 30 minutes later (it was the easiest piece of furniture I've ever had to assemble), here's da crib.  (We've decided to always refer to it as "da crib" in order to maintain some street cred.)

I absolutely love it.  It's solid, made of real wood, has no formaldehyde, and was made in the USA!  Plus it converts to a toddler/youth bed, and then will convert to an adult-size full bed eventually.  SWEET.


Last weekend we assembled this Ikea dresser (which took a few hours) and I'm in love with it too:


So, we have the two biggest pieces of the nursery done!  I'm so excited!  I'll show bits and pieces of the progress here on the blog, but I think I'm going to save whole room photos until we're done. 

I got a few other things done this weekend, including getting started on Christmas shopping!  (Holy bejeebus--I know!!!)  I'm not one of those hyper-organized, let's-start-Christmas-shopping-in-August people normally, but I just have a feeling that both finanially and for my sanity's sake, it'll be better for me to get Christmas shopping done before December.  I have a hunch that I'm not going to want to stand in line at the mall at 8 months pregnant. 

So there you have it--my weekend.

Tuesday, September 6, 2011

Weekend Recap + a Recipe

How great are three-day weekends?  I love them (and could certainly use more)!  This weekend was the perfect amount of productivity and relaxation.  Ahhhhh...

On Saturday night Chris made homemade pizza with chicken andouille sausage and spinach:


On Saturday we also picked out and ordered our crib!  Thank goodness we did too, because it's going to take 10-12 weeks for delivery--that'll put me at 32-34 weeks!  Yikes!

On Sunday we assembled the Ikea dresser that I bought last week.  Griz helped, naturally:


Seriously, this cat will not leave us alone:


On Monday night we had a few friends over and I made a tomato pie.  Have you ever had tomato pie?  It's only like the best. thing. ever.

Carmelized onions:


Health food (cheese and mayo):


Almost done:


Seriously, this stuff is SO GOOD.  And because I'm nice, here's the recipe from SimplyRecipes.com


Ingredients

• 1 9-inch pie shell
• 1/2 yellow or red onion, chopped
• 3-4 tomatoes, cut in half horizontally, squeezed to remove excess juice, roughly chopped, to yield approximately 3 cups chopped tomatoes
• 1/4 cup sliced basil (about 8 leaves)
• 2 cups grated cheese (combination of sharp cheddar and Monterey Jack, or Gruyere or Mozarella)
• 3/4 cup mayonnaise
• 1 teaspoon (or more to taste) of Frank's Hot Sauce (or Tabasco)
• Salt and freshly ground black pepper

Directions

1.  Preheat oven to 350°F. Place pie shell in oven and cook for 8-10 minutes or longer until lightly golden. If you are starting with a frozen crust, you'll need to cook it a little longer. If you are using a homemade crust, freeze the crust first, then line the crust with aluminum foil and pre-bake it for 20 minutes, then remove the foil and bake an additional 10 minutes.

2.  Squeeze as much moisture as you can out of the chopped tomatoes, using either paper towels, a clean dish towel, or a potato ricer.

3.  Sprinkle the bottom of the pre-cooked pie shell with chopped onion. Spread the chopped tomatoes over the onions. Sprinkle the sliced basil over the tomatoes.

4.  In a medium bowl, mix together the grated cheese, mayonnaise, Tabasco, a sprinkling of salt and freshly ground black pepper. The mixture should be the consistency of a gooey snow ball. Spread the cheese mixture over the tomatoes.

5.  Place in oven and bake until browned and bubbly, anywhere from 25 to 45 minutes.

Serves 6.


Seriously, make this while tomatoes are still in season.  You'll love it.
Related Posts Plugin for WordPress, Blogger...